Cassandra Updates Ordering

When faced with a task of picking a database for a project we need to consider a lot of tradeoffs. Finding and fully understanding the limitations and implications of using each candidate databases is very hard. It’s often the case that some database behaviors, which have huge impact on our use case, are buried deep in the documentation or even require diving into the codebase. For me personally, one of those unexpected behaviors was the way Cassandra updates ordering works.

Ordering is tricky

One of the classic problem in distributed systems is ordering of messages. It’s problematic in cases when concurrent updates for the same key can be proposed. In such case nodes have to somehow agree on what is the actual order. The problem is however, way easier to solve if there are no concurrent updates. Since Cassandra is leaderless database multiple writes can be accepted by multiple nodes concurrently. It’s therefore crucial to understand how Cassandra handles such cases. Here are some quotes from the documentation:

As every replica can independently accept mutations to every key that it owns, every key must be versioned. Unlike in the original Dynamo paper where deterministic versions and vector clocks were used to reconcile concurrent updates to a key, Cassandra uses a simpler last write wins model where every mutation is timestamped (including deletes) and then the latest version of data is the “winning” value

Later in the same page it’s mentioned that:

Specifically all mutations that enter the system do so with a timestamp provided either from a client clock or, absent a client provided timestamp, from the coordinator node’s clock. Updates resolve according to the conflict resolution rule of last write wins. Cassandra’s correctness does depend on these clocks, so make sure a proper time synchronization process is running such as NTP.

and also:

Rows are guaranteed to be unique by primary key, and each column in a row resolve concurrent mutations according to last-write-wins conflict resolution. This means that updates to different primary keys within a partition can actually resolve without conflict

I may be an exception, but after reading the documentation I personally came to conclusion that Cassandra only needs to resolve conflicts if there are concurrent updates (and uses timestamp for that). I came to this conclusion after reading docs, since there are:

  • Mentions of “concurrent” updates in sections describing reconciliation/conflict resolution.
  • Mentions of “versioned key” statements. To me this indicates there is some kind of version ordering implemented (something equivalent to MVCC or vector clock in Dynamo).
  • Comparisons to Dynamo’s reconciliation process, that implements ordering based on vector clock. In such implementation only concurrent updates impose problem for ordering.
  • Mentions of “Last Write Wins” which hints that “whatever is written last, wins”.

It was not sure if my understanding of documentation is correct, so I decided to test that.

No logical ordering, only timestamps matter

Turns out my assumptions were wrong and conflict resolutions occur even when there are no concurrent updates. If a single client sends updates to Cassandra cluster (sequentially with CONSISTENCY=ALL) there is no guarantee that the final value is going to be the last one that the client has sent. Basically, when performing standard insert/update, all that matters is the timestamp attached to the value. It doesn’t matter what was the actual order of applied updates. If timestamp of new value happens to be smaller than timestamp of existing value, new value will simply be discarded. Cassandra only relies on timestamps provided by client or node itself (with some exceptions mentioned few sections below). How are those timestamps picked then?

Timestamps generated by Cassandra nodes

The timestamp for a statement can be provided either by the client or the coordinator node (the node that received request from a client). If there is a clock skew between cassandra nodes in a cluster, even if your client is sending requests sequentially (using load balancer) the final value might may not be the last one even though there was no concurrent updates and CONSISTENCY was set to ALL.

Timestamps generated by clients

Similarly, imagine you have a stateless app that sends updates to cassandra. This app has multiple instances which are reachable via load balancer using round-robin. Timestamps for Cassandra updates are set by clients (your app instances), but the clocks are out of sync. Since clocks on those clients are all over the place, the timestamps assigned to updates received by cassandra would also be all over the place. Even if you perform requests to the load balancer sequentially the final value might therefore may not be the last one.

Testing ordering wth out of sync clocks

Test source code available on github.

In order to test those scenarios I created a 3 node cassandra cluster using docker compose. Since docker containers share clock with host, all the cassandra nodes are perfectly in sync. In order to simulate clock skews I used libfaketime to set clocks as follows:

  • Cassandra 1: 3 seconds behind host
  • Cassandra 2: 6 seconds behind host
  • Cassandra 3: 9 seconds behind host

I also had to make a small tweak to the cqlsh.py to make sure server timestamps are used: self.session.use_client_timestamp=False.

After starting the cluster and creating test tables I run following script:

docker exec -it cass1 cqlsh -e "CONSISTENCY ALL; INSERT INTO ordering_test.ordering_test(key, value) VALUES('key', 'value_1')"
echo "Inserted 'value_1'"

docker exec -it cass2 cqlsh -e "CONSISTENCY ALL; INSERT INTO ordering_test.ordering_test(key, value) VALUES('key', 'value_2')"
echo "Inserted 'value_2'"

echo "Selecting current value"
docker exec -it cass3 cqlsh -e "CONSISTENCY ALL; SELECT * FROM ordering_test.ordering_test"

The first insert statement is sent to cass1 while second statement is sent to cass2. The select statement is sent to cass3.

Since consistency is set to ALL and queries are executed sequentially (there is no concurrency) it’s logical to expect that the final value would be value_2, right? However, since cass2 clock is 3 seconds behind cass1, value_1 has greater timestamp than value_2 and final result is value_1:

Consistency level set to ALL.
Inserted 'value_1'

Consistency level set to ALL.
Inserted 'value_2'

Selecting current value
Consistency level set to ALL.

 key | value
-----+---------
 key | value_1

I also wanted to make sure if timestamp of select doesn’t affect the result. AFAIK Cassandra doesn’t support MVCC or any similar feature, but it’s worth testing. cass3 (which is used for performing select at the end) has the biggest clock drift (9 seconds behind host). If there was MVCC-like feature present, the select should therefore return an empty value. After all, when cass3 performs select, there is no value with timestamp <= cass3’s timestamp. We can debug this by adding SELECT dateof(now()) FROM system.local to each command like so:

docker exec -it cass1 cqlsh -e "CONSISTENCY ALL; INSERT INTO ordering_test.ordering_test(key, value) VALUES('key', 'value_1'); SELECT dateof(now()) FROM system.local"
echo "Inserted 'value_1'"

docker exec -it cass2 cqlsh -e "CONSISTENCY ALL; INSERT INTO ordering_test.ordering_test(key, value) VALUES('key', 'value_2'); SELECT dateof(now()) FROM system.local"
echo "Inserted 'value_2'"

docker exec -it cass3 cqlsh -e "CONSISTENCY ALL; SELECT dateof(now()) FROM system.local, * FROM ordering_test.ordering_test; SELECT dateof(now()) FROM system.local"

Results:

Consistency level set to ALL.

 system.dateof(system.now())
---------------------------------
 2022-11-14 17:26:51.706000+0000

Inserted 'value_1'


Consistency level set to ALL.

 system.dateof(system.now())
---------------------------------
 2022-11-14 17:26:49.927000+0000

Inserted 'value_2'


Selecting current value
Consistency level set to ALL.

 key | value
-----+---------
 key | value_1
 
 system.dateof(system.now())
---------------------------------
 2022-11-14 17:26:47.828000+0000

As you can see, timestamp at each subsequent statement is smaller than the previous one. This indicates that select timestamp doesn’t influence the results.

Sources

According to my research the reconciliation is implemented by Cell.reconcile(c1, c2):

public static Cell<?> reconcile(Cell<?> c1, Cell<?> c2)
    {
        if (c1 == null || c2 == null)
            return c2 == null ? c1 : c2;

        if (c1.isCounterCell() || c2.isCounterCell())
            return resolveCounter(c1, c2);

        return resolveRegular(c1, c2);
    }

As you can see above counter cells are handled different (more about it in the next section). Apart from that, the reconciliation process for regular cells is very simple and purely based on timestamps. If timestamps are different, value with higher timestamp is picked:

long leftTimestamp = left.timestamp();
long rightTimestamp = right.timestamp();
if (leftTimestamp != rightTimestamp) 
    return leftTimestamp > rightTimestamp ? left : right;

In rare scenario when timestamps are the same, tombstones are prioritezed. If there are no tombstones then greater value is picked:

return compareValues(left, right) >= 0 ? left : right;

Are there any exceptions to timestamp based ordering?

To make things more fun there seems to be some exceptions. There are probably more - those are just the ones I encountered.

COUNTER columns updates actually behave as we would expect. Instead of using timestamps, cells of type COUNTER merges conflicting values. It makes sense, since counters can only be updated by some delta (They can’t be set to specific value). Since counter can only be updated by delta, the order of how those deltas are applied really doesn’t matter, does it?

Cassandra supports lightweight transactions that are using paxos in order to achieve a consensus for a new value proposed by one of the nodes. In our example, it can be triggered by using IF EXISTS like so:

UPDATE ordering_test.ordering_test SET value = 'value_1' where key = 'key' IF EXISTS

By using lightweight transactions the actual ordering of updates is respected and the final value is indeed value_2 as we would expect. However, since paxos is used, a lot of communication between nodes is required to achieve consensus which probably has serous performance implications.

What can we do about it?

We should try to keep our servers clocks in sync. Both clients and Cassandra servers. Properly configured NTP, however, doesn’t guarantee that there will be no problems mentioned above as there can always be some small drifts. Here are few ideas I came up wth to eliminate or at least reduce to minimum clock related issues:

  • Simply do not update existing values at all. If we only insert new values without conflicting keys the problem basically does not exist. Instead of updating you can add new entries and periodically remove old ones. If using CQRS pattern you can even use separate database for serving reads and use cassandra only for writes and streaming events to the read side.
  • Use client timestamps and always perform updates for the same key from the same client. This can be achieved by having consistent hashing so that the same client receives requests for the same entity all the time.
  • Use USING TIMESTAMP in your INSERT/UPDATE explicitly. If your data already has some notion of timestamps/ordering key you can use it to set timestamp on a row explicitly.
  • Use lightweight transactions, but be aware of decreased performance.
  • If possible, model your column using COUNTER type (however it has another set of limitations and quirks).

If I missed something or some of my conclusions are wrong please let me know in the comments.
Arduino OBD DPF monitor

If you own a diesel car chances are you know about issues caused by unsupervised DPF burnouts. Knowing when DPF soot is going to be burned out and what is the current status of burning is crucial for keeping many vehicle components in good condition.

Existing solutions for monitoring DPF

How can you monitor it then? There are few ways:

  1. Having car that can display DPF information by default. Unfortunately most vehicles don’t provide any information about DPF on dashboard (does anybody know why?).
  2. LED burnout indicator. When burning soot many cars turn on additional electronic devices to create higher load on engine. One of such devices is mirror heater. You can simply install LED by attaching it to the same circuit mirror heater use. When soot is being burned, mirror heats and LED turns on. The drawback of this solution is we don’t get to know DPF fill percentage, burning status or kms since last regeneration. If we don’t know the DPF fill percentage we can’t predict when the process is going to trigger. It can therefore happen in the middle of busy traffic downtown which would suck.
  3. Use OBD scanner and smarphone app like OPL DPF MONITOR. This solution provides all the information we need. The drawback is we have to turn on app each time, connect to bluetooth and mount the phone in visible place. Whole process is too tedious for me to do every time. On top of that screen is active all the time which drains a lot of battery. We also can’t use phone’s bluetooth for other purposes (playing music etc.).

Arduino + OBD = <3

We can however replace smartphone with arduino to display results on LCD. It will turn on, connect and turn off automatically when entering and leaving the car.

The solution I developed is for Opel Insignia but should work for any car. I tested few different combination of bluetooth modules and OBD readers. Some of them were either unable to read Insignia PIDs (these are non standard OBD codes), or they were unable to communicate with each other over bluetooth. Pay extra attention to what components you buy.

We’re gonna need:

  1. Arduino Nano
  2. OBD reader - iCar2 Vgate Bluetooth 3.0 (many cheap ELM327s do not work)
  3. Bluetooth module - HC-05 v3 (v2 won’t work)
  4. 2x16 LCD with i2c converter
  5. 3d printer (optional)

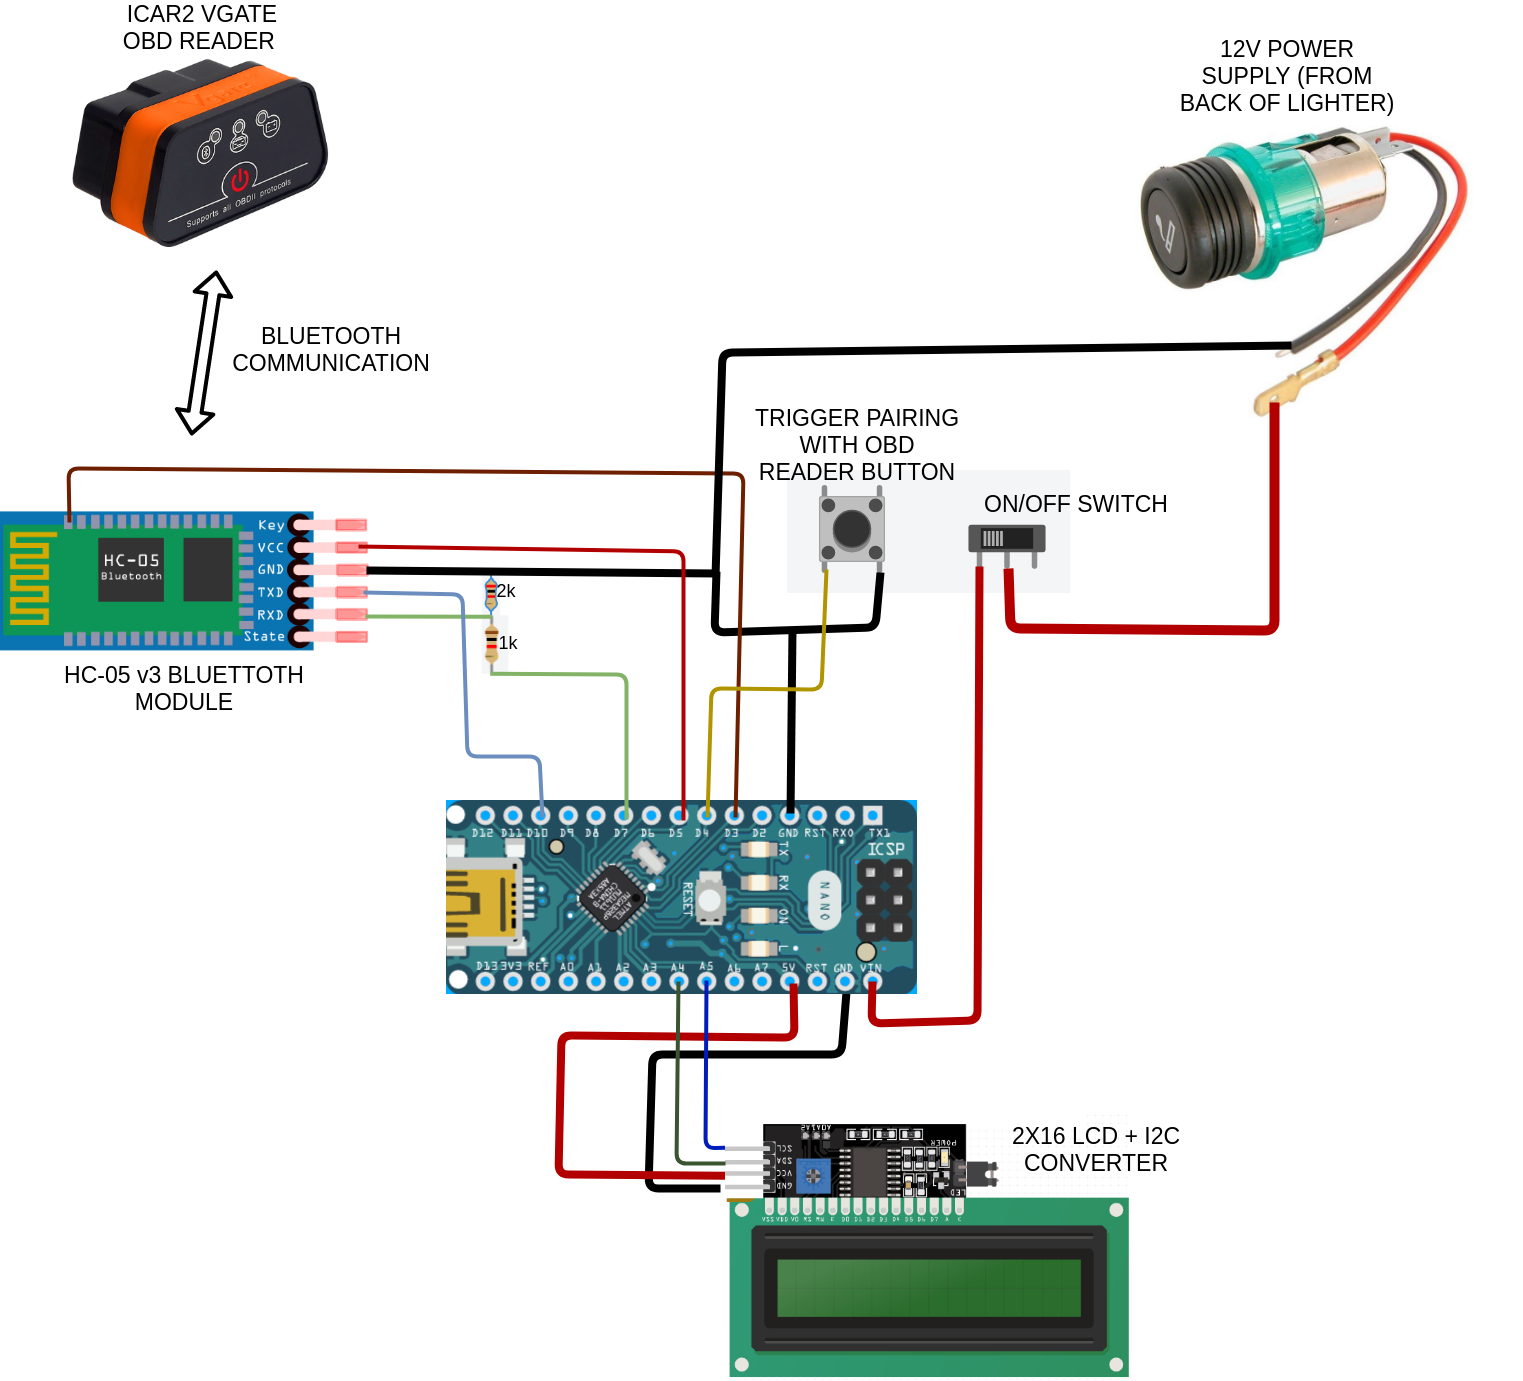
Arduino uses HC-05 bluetooth module to communicate with OBD reader. Results are displayed on LCD which is also connected to arduino.

Wiring

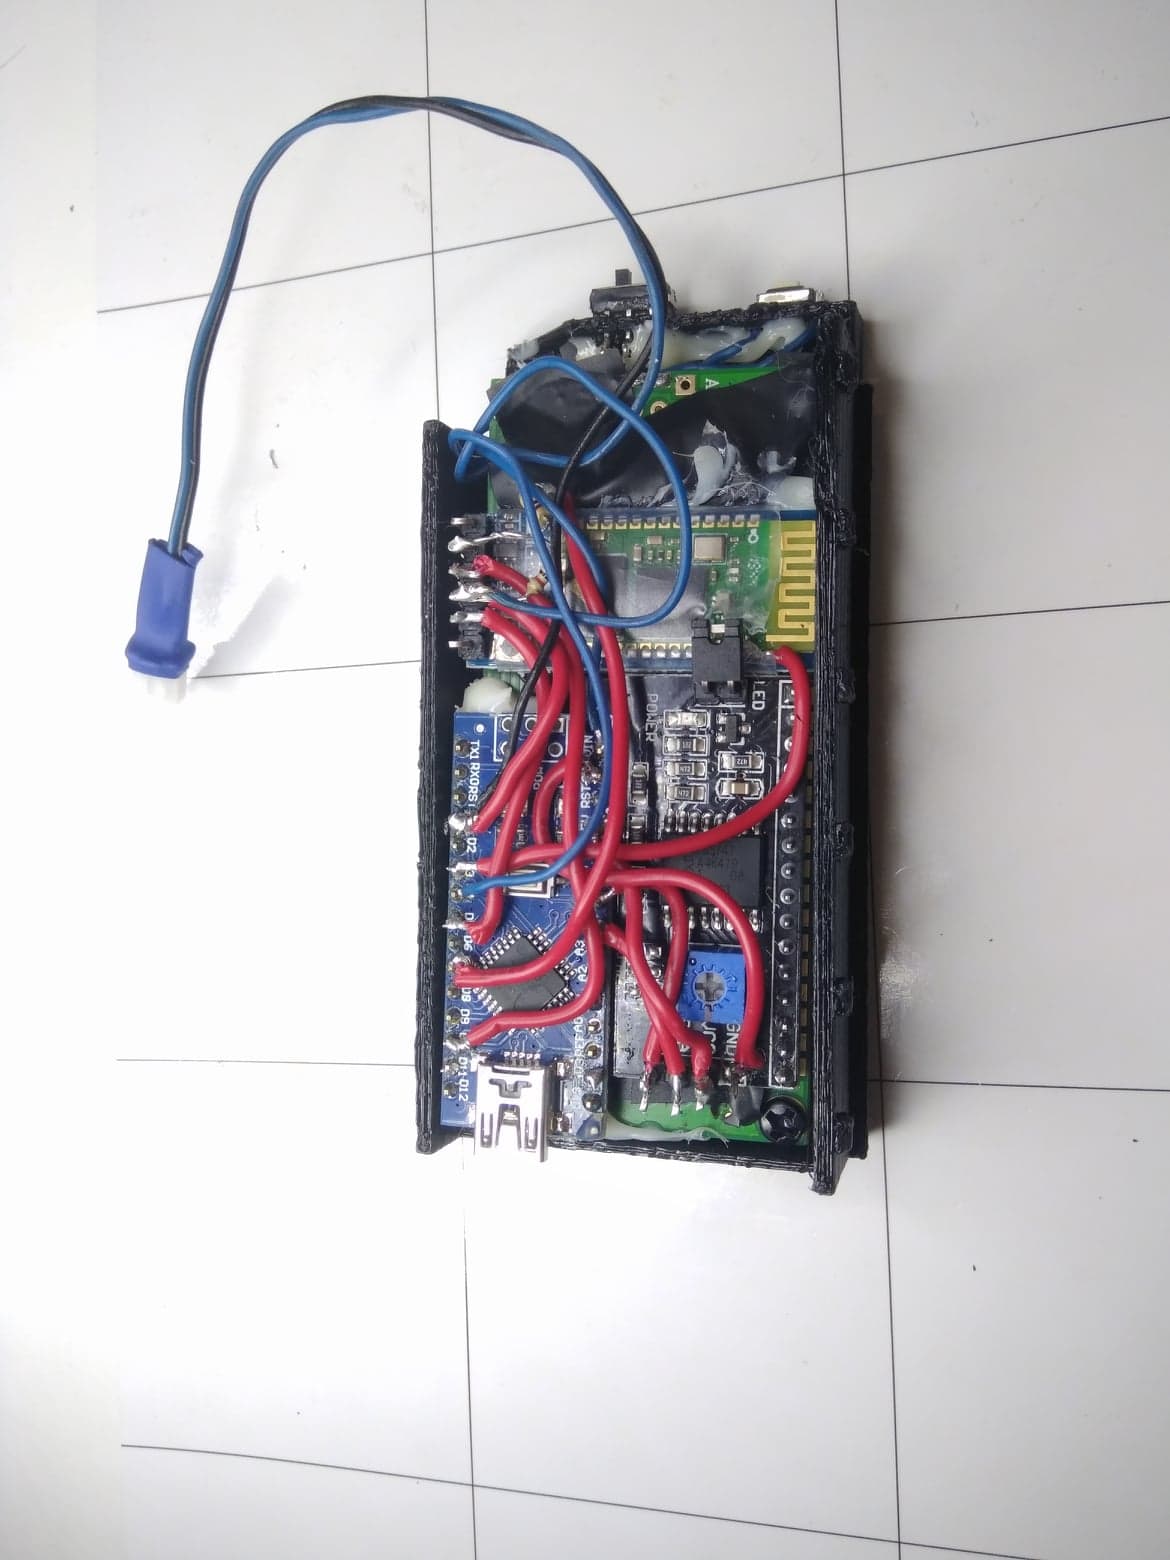
WiringSchematic WiringSchematicPhoto

HC-05 bluetooth module

Communication between arduino and HC-05 module is done over UART. We don’t want to use hardware serial (RX,TX pins) - afaik if we did we wouldn’t be able to debug using PC. Since we don’t need super high speed software serial is more than enough so we can use any digital pin. Pin 10 and 7 were therefore chosen. Since HC-05 expects 3.3v to be sent to it’s RX pin we add voltage divider composed of 2k and 1k resistors to reduce arduino’s digital output from 5v to 3.3v.

We also need to be able to reset and reconfigure HC-05 using arduino. This is neccessary in order to pair with new OBD reader device. HC-05 will then be unable to connect with it and will need reconfiguration.

In order to boot HC-05 into configuration mode it’s 34pin has to be pulled HIGH (5v) and the module has to be reset. We use arduino digital pin 5 and 4 for that purposes.

Bluetooth configration button

The purpose of button is to allow user to trigger HC-05 configuration. It’s required after new OBD reader is used or existing OBD reader was used with different device.

On/off switch

Even though the device will automatically turn itself on and off when user enters/leaves the car (it’s using same circuit as 12v lighter socket) it’s a nice feature to have.

LCD

2x16 LCD alone requires a lot of wires to work with arduino. It’s easier to solder i2c converter to it and just connect 2 wires to arduino.

Lighter socket power supply

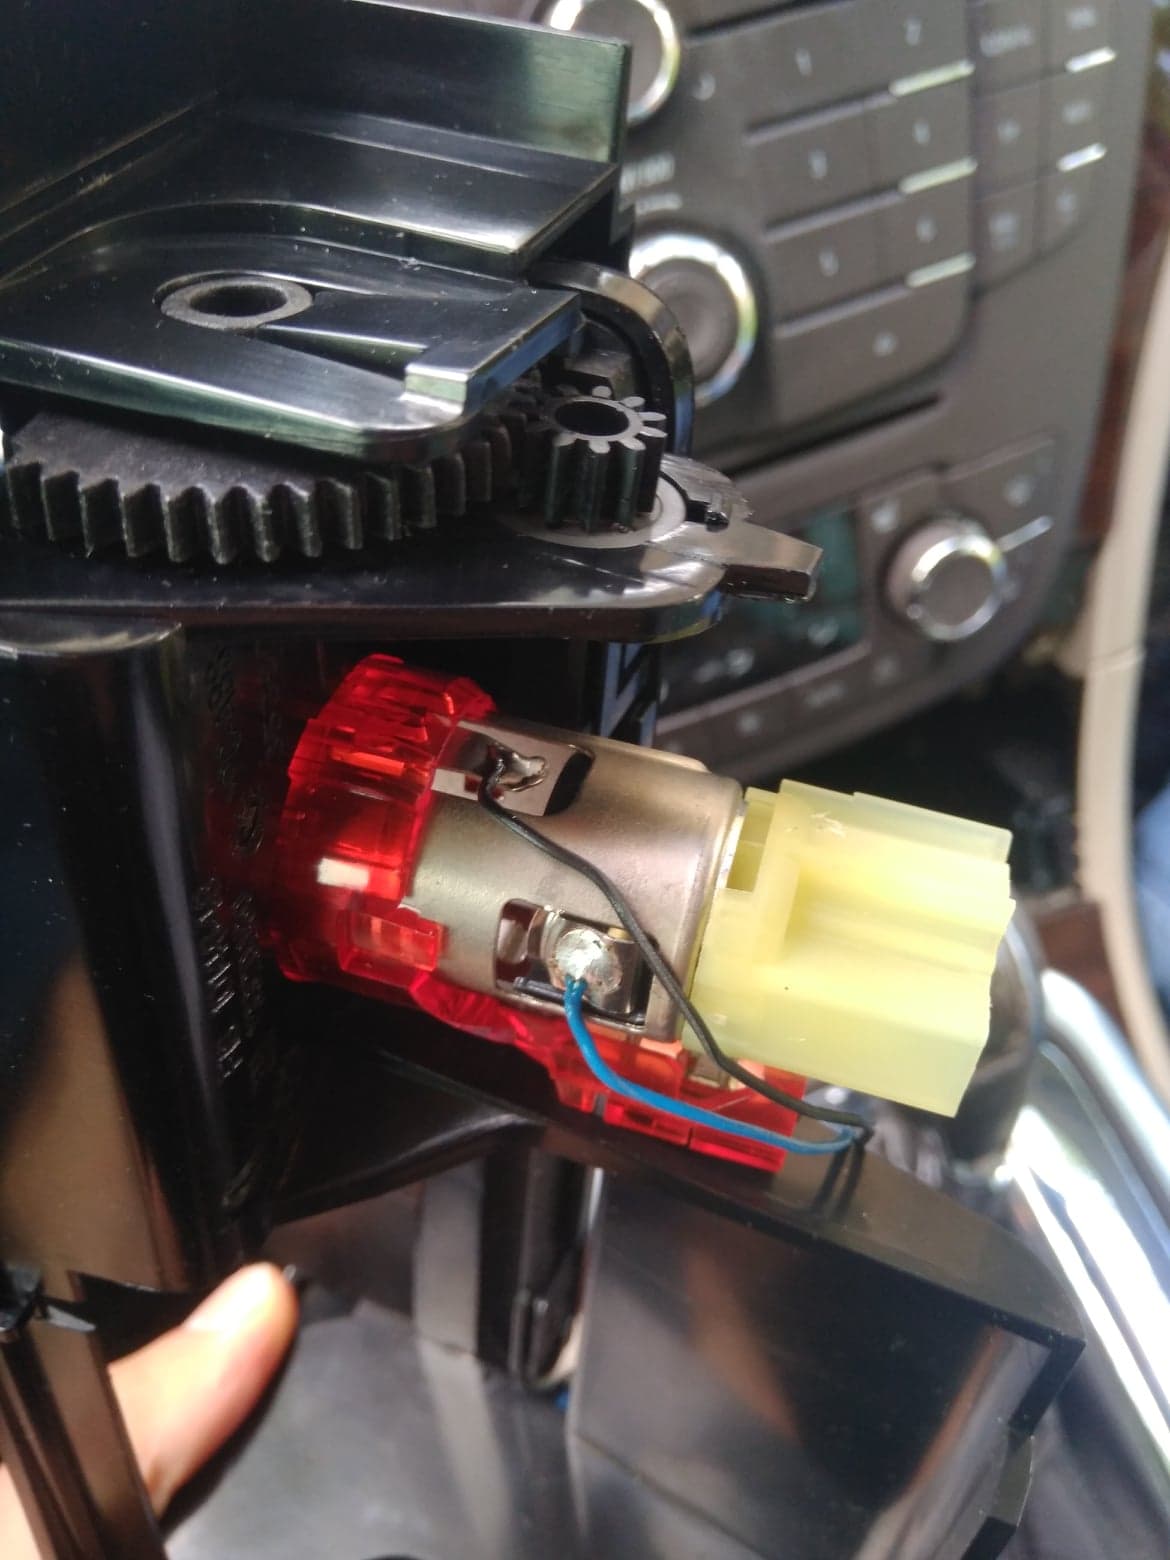
In my opinion 12v lighter socket is the best source of power. It will turn on when ignition is turned on. It will turn off when user leaves car (opens door after turning off engine). In case of Insignia it is also in a very convenient place. Next to the lighter socket there is handy hole that we can use for placing and hiding guts of our device. It’s very easy to solder directly to lighter socket on the back where it is not visible. You will however need to disassemble panel that holds it in place and unplug the lighter socket.

LighterSockerCables

Plastic case

You can download 3d model here. It will lock in nicely into the hole that is next to the lighter socket in Opel Insignia. If you dont have a 3d printer you can buy/find existing case and cut hole for lcd.

Coding

Click here to get full code from github.

We need to pull 3 types of data from a car:

  1. DPF regeneration status. 0 if not burning. 1-255 if burning (percentage completed).
  2. DPF fill percentage (0-100).
  3. Distance since last burnout (in kms).

In case of Opel Insignia these are following PIDs - (223274, 223275, 223277). Finding PID codes for your car might be challenging. Personally I couldn’t find anything online. I ended up sniffing what commands are sent by OPL DPF MONITOR android app. I used a method describere here to sniff bluetooth traffic.

PID is just a command that is understood by at least one of the car’s module. Because above PIDs are not standardized we also need to provide header. Header is a destination for a PID command to be issued. This tells OBD reader to send it to specific car’s module. In case of Insignia it is 7E0 which is just an engine computer.

To retrieve data we therefore need to first set header to 7E0:

vgate.sendCommand("AT SH 7E0")

Afterwards we can query PIDs:

int32_t getRegenerationStatus() {
  return queryVgate(0x22, 0x3274);
}

int32_t getKmsSinceDpf() {
  return queryVgate(0x22, 0x3277);
}

int32_t getDpfDirtLevel() {
  return queryVgate(0x22, 0x3275);
}

Luckily ELMduino library handles all the details when it comes to communication with OBD reader. Just make sure you use newest version. It seems to be actively developed. I personally found one edge case and submitted PR - maintainer approved and merged it the same day.

To display values on the lcd simply use LiquidCrystal_I2C library like so:

lcd.clear();
lcd.setCursor(0,0);
String message = "LAST: ";
message = message + kmsSinceDpf + "KM";
lcd.print(message);
lcd.setCursor(0,1);
message = "FILL: ";
message = message + dirtLevel + "%";
lcd.print(message);

HC-05 auto-configuration

In order to pair HC-05 module with OBD reader it needs to be launched in configuration mode. This is done by either pressing and holding button on the HC-05 module or setting pin 34 to high when powering. This project makes the process automatic when “TRIGGER PAIRING WITH OBD READER BUTTON” is held. It will set pin 34 to high and reset HC-05 module. Afterwards arduino will send all the necessary pairing commands, set pin 34 to low and reset HC-05 again. Afterwards it will launch into normal mode and start connecting to paired OBD reader every time it is powered on. Just make sure to replace your OBD reader bluetooth address in the code:

sendCommand("AT+BIND=86DC,3D,ABF7F1");
sendCommand("AT+PAIR=86DC,3D,ABF7F1,20",10000L);
sendCommand("AT+LINK=86DC,3D,ABF7F1",10000L);

Don’t worry if AT+INIT command returns ERROR. It’s “normal” for v3 module according to online resources :).

Applied Akka Patterns - Book Review

I recently watched Wade Waldron’s talk “Domain Driven Design and Onion Architecture in Scala” which I found really great. What stood out was Wade’s gift for explaining confusing topics in a way that anyone could understand.

Few days later I googled dude’s name and it turned out him and Michael Nash are about to release a book called “Applied Akka Patterns”. I skimmed through the table of contents and was initially going to read only one chapter, but damn, this book turned out to be excellent and I had to read it cover to cover.

So many questions answered

When I first started learning Akka I had so many questions and there was no one to answer.

Should entire system be based on actor model or can I just use it parts of it? How to deal with blocking operations? When to use futures and when to use actors? How does DDD fit into akka? How to monitor and find bottlenecks in akka based system? Which operations deserve separate dispatcher? “Tell don’t ask” - when should I use ask then? Which supervision strategies are useful in which scenarios? I found answer to those questions on my long and painful path reading other people’s code and finding fragmented information here and there.

The book answers all those questions and many many more. It amazes me how much useful content is packed into such a small volume (200 pages). Some books leave you with more questions than you had had before you grabbed it - not this one. There were numerous times when I was reading a paragraph and thought to myself “Oh, that’s fine but what about…?” and then the answer was found right there on the next page. It almost feels like the authors took some beginner akka programmer, asked to read the chapter and write all the questions down. I also like that the book is very pragmatic - the theory is compressed to absolute minimum and almost all statements are backed up by practical examples - even chapter regarding DDD.

The book is full of useful information. Here are just some off the top of my head:

  • The world is asynchronous so why model it in a synchronous way?
  • When, and at what scale should you use actors
  • How to implement D(distributed)DDD with akka.
  • Different ways to handle state changes within an actor
  • Handling long running operations within the actor
  • Alternatives to using ask pattern, and when it is ok to use ask
  • Where to keep message classes
  • How to structure messages flow to achieve best throughput and latency
  • How to prevent mailbox overflow
  • Consistency vs. Scalability and how akka sharding can help with balancing them
  • Isolating failures and self healing
  • Preparing for failures even at the jvm level
  • Maximize availability
  • Find bottlenecks within jvm and akka itself

For who?

I feel like when getting started with akka you are given this massive set of tools and you neither have an idea which ones are best suited for certain situations, nor what are best practices. There are gazillions of resources describing what is akka and how to get started with it. What is lacking though are set of best practices and common patterns. Akka toolkit is really dangerous when put in the wrong hands. We, beginner/intermediate akka users, need those patterns and best practices compiled into one resource to protect against those mistakes. I think the book aims for this niche and nails it flawlessly.

Final rant

One thing I missed was some kind of a bullet point list below each chapter with the most important statements. The book has so much material that I had to write my own notes, otherwise I would not be able to retain all the information.

Implementing Websocket Game Server with Scala and Akka Streams [Part 4/4]

This is the last part where I code a client.

Thanks to everyone who watched the series! I know at times it was a bit hard to follow. I’ve made a mistake of coding and trying talk at the same time. It turns out it is a really hard and you cannot fully focus on both. Next time I’m going to do one thing at the time and then merge it in post-production.

Code: https://github.com/JakubDziworski/Akka-Streams-Websocket-Game-Server

Other parts: Implementing Websocket Game Server with Scala and Akka Streams

Implementing Websocket Game Server with Scala and Akka Streams [Part 3/4]

Last part of server side implementation. The remaining piece of the puzzle is client side which is next part’s subject.

Code: https://github.com/JakubDziworski/Akka-Streams-Websocket-Game-Server

Other parts: Implementing Websocket Game Server with Scala and Akka Streams

Implementing Websocket Game Server with Scala and Akka Streams [Part 2/4]

Second part of server side implementation.

Code: https://github.com/JakubDziworski/Akka-Streams-Websocket-Game-Server

Other parts: Implementing Websocket Game Server with Scala and Akka Streams

Implementing Websocket Game Server with Scala and Akka Streams [Part 1/4]

First part of server side implementation

Code: https://github.com/JakubDziworski/Akka-Streams-Websocket-Game-Server

Other parts: Implementing Websocket Game Server with Scala and Akka Streams

Github Code Search - Programmers' Goldmine

Learning new language or framework can sometimes be a struggle. Traditional approach is to read documentation which explains the concepts, and provides simple examples. Sometimes that might be enough, but what those documentations are often lacking are some advanced examples and usages in real projects.

Coming across a problem which is not described in documentation, most people look for solution on stackoverflow (or dig through sources). However the framework you are using might not be in the game for long enough to fill stackoverflow with every question you come up with.

Have you ever been stuck with a problem and thought to yourself:

“I know someone must have solved this before! Why there is no stackoverflow answer to this problem?”

You are right - someone has probably already solved it. And it’s very likely the solution has been pushed to github. It’s just a matter of finding it. Programmers are more likely to solve the issues themselves rather than ask random people on the internet about it.

Github search code

Github search provides a way to query repos in a various ways. One of them is searching code. This is extremly powerful feature. Every line ever written by anybody can be found with simple queries. The “good” thing about github is that the private repos are not free, so there are many projects implicitly shared to public by people who just want to backup their code. This is a goldmine of information!

Examples

Below are some of the examples which I find github search code is handy for.

Learning new api

Have you ever been stuck with 3rd party api, and unable to find similar code snippets for your case?

I was recently in need to use akka streams to read a huge file and pass the results to another file instantly. The documentation regarding this topic is good but short and could provide more examples.

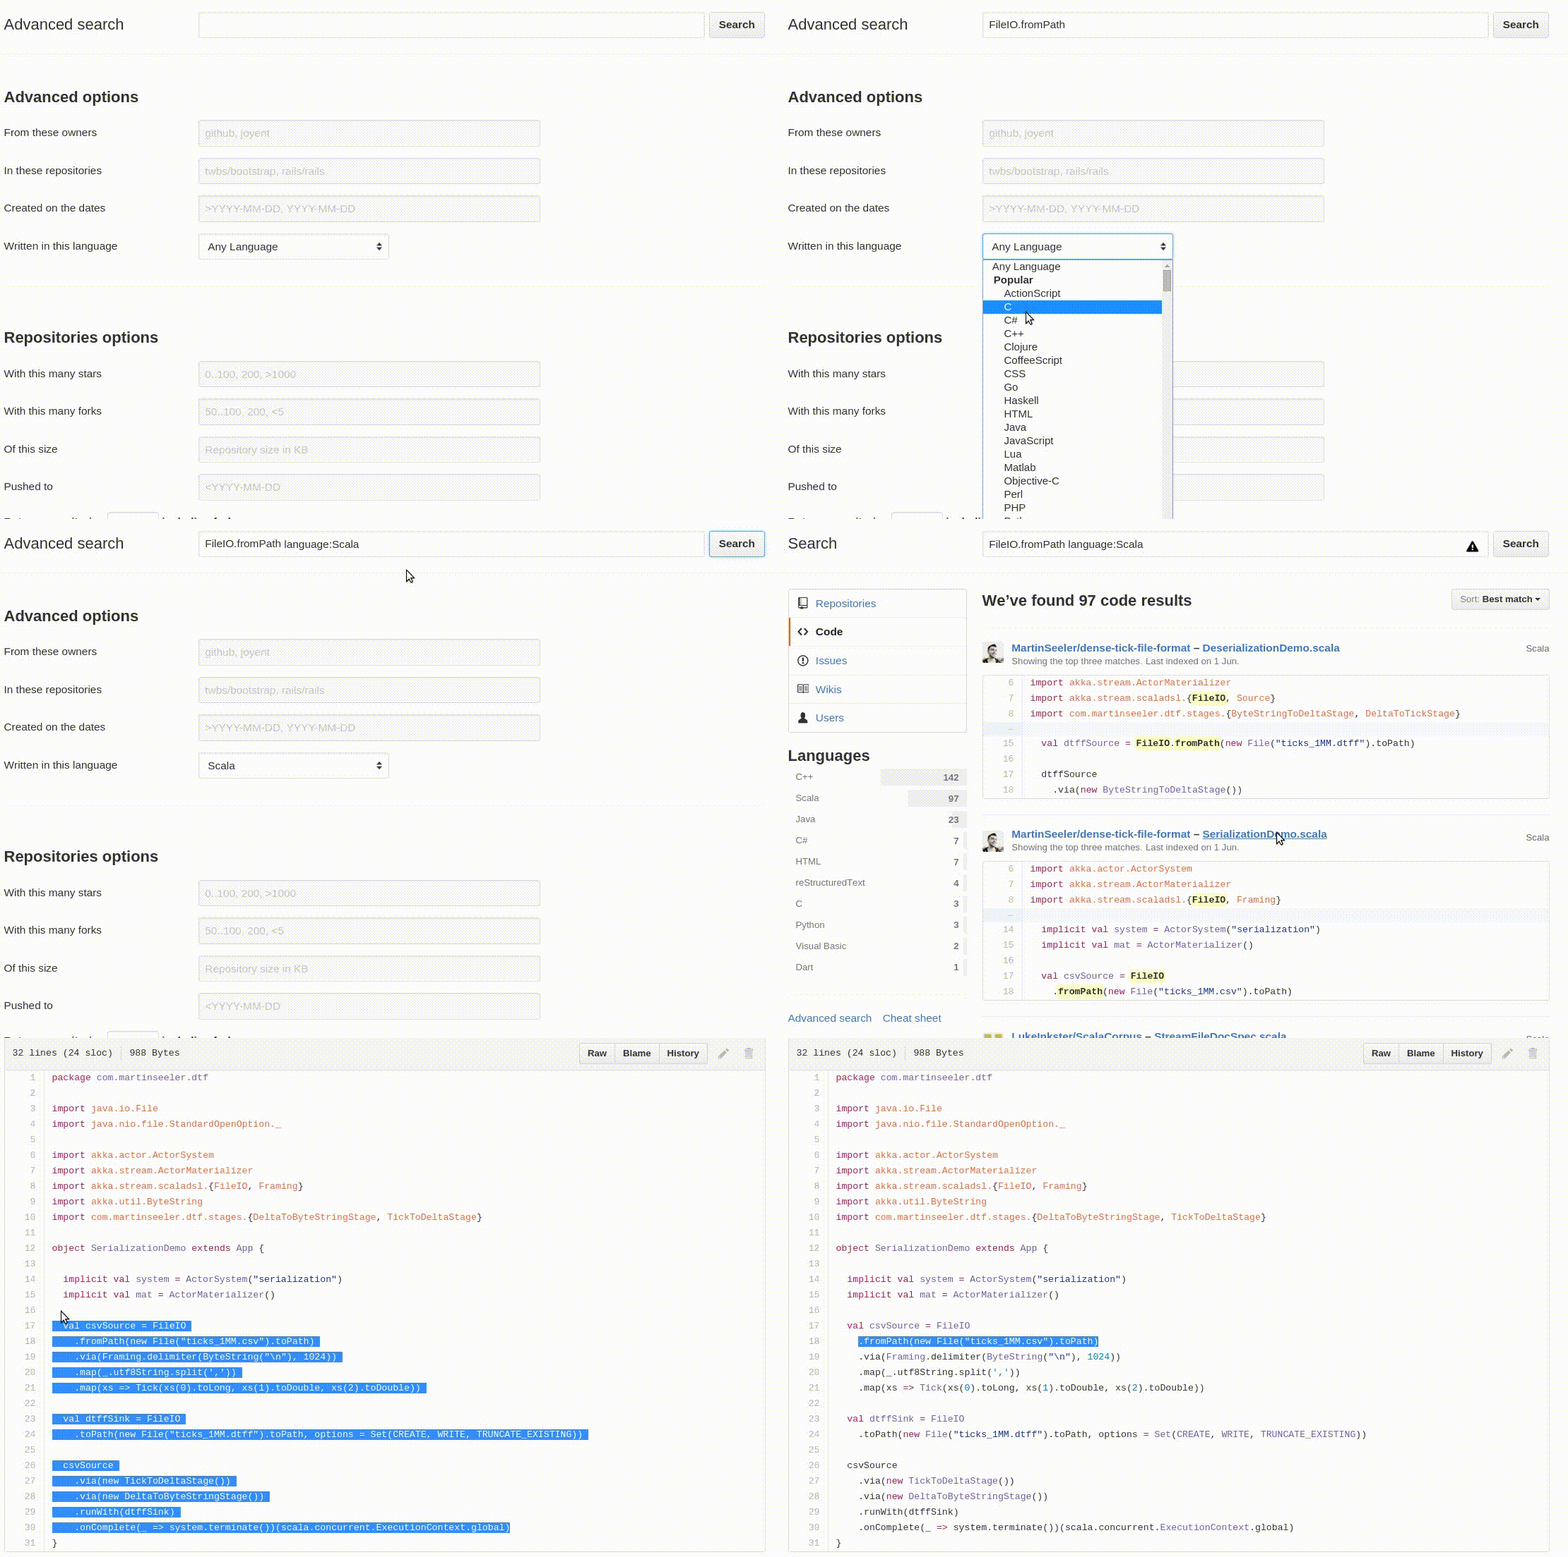
Github advanced search to the rescue. After few clicks I found an awesome piece of code that streams the csv file modifies it and dumps to another file!

filepaths_example

Finding projects using technologies you are interested in

Let’s say you want to learn Spring MVC, Hibernate and testing with Spock. You could go to the docs of each libraries, and learn them one by one… or just find a project which integrates all of them.

Most platforms have some kind of dependency management tools. In case of Java that is usually Maven which stores all dependencies information in pom.xml file.

You can therefore query keywords and filename to find the projects you are interested in:

spring hibernate spock filename:pom.xml

This method is also great if you are looking for projects to contribute to.

find_technology

Integrating with external services

Looking for a quick way to integrate with github api using your favourite language? No problem - just look for the repos with the api url and filter by language:

api.github.com language:scala

find_integrations

Configuration

It also wouldn’t hurt to take a look at configuration files of real big projects. This might be extremly helpful, particularly in case of immature frameworks.

Let’s take a look how to configure akka cluster. Such configuration should contain ClusterActorRefProvider keyword and reside in file with .conf extension (usually application.conf):

ClusterActorRefProvider extension:conf

find_configuration

Conclusion

Github search is underrated yet extremly powerful tool for learning new apis,solving issues and finding repos you might be interested in. This is a great way to quickly get started with new framework - finding code snippets that are similar to what you want to achieve has never been easier. It also makes you feel less alone with the issues you encounter - it’s very likely some has already solved them. Likewise, discovering interesting projects with this search engine is just a matter of minutes.

JShell - Java 9 interpreter (REPL) - Getting Started and Examples

Many compiled languages include tools (sometimes called REPL) for statements interpretation. Using these tools you can test code snippets rapidly without creating project.

Take Scala as an example. Compilation can sometimes take a long time, but using repl each statement is executed instantly! That’s great when you are getting started with the language. Each expression gives you returned value and it’s type - that’s very valuable information.

In java, instead, we have to create a test or main method which prints results and needs to be recompiled every time you make a change.

When?

JShell will be introduced in Java 9 realease. You can however get early access build on https://jdk9.java.net/.

Running

Once you downloaded jdk9 there is a jshell executable in a bin directory. I suggest running it in verbose (-v) mode for the first time:

kuba@kuba-laptop:~/repos$ jdk-9/bin/jshell -v
|  Welcome to JShell -- Version 9-ea
|  For an introduction type: /help intro


jshell> 

You can go back to non verbose mode using /set feedback normal.

Default imports

By default you get a set of common imports:

jshell> /imports
|    import java.util.*
|    import java.io.*
|    import java.math.*
|    import java.net.*
|    import java.util.concurrent.*
|    import java.util.prefs.*
|    import java.util.regex.*

You can add your own any time.

Expressions

You can type any valid java expression, and it will tell you the returned value, it’s type and assign it to a variable:

jshell> 3+3
$1 ==> 6
|  created scratch variable $9 : int

jshell> $1
$1 ==> 6
|  value of $1 : int

Variables

It is possible to declare variables and name them. Once you do that they become visible in the scope.

jshell> int x=5
x ==> 5
|  created variable x : int

jshell> x
x ==> 5
|  value of x : int

Methods

You can also define methods and even replace them:

jshell> void helloJShell() { System.out.println("hello JShell"); }
|  created method helloJShell()

jshell> helloJShell();
hello JShell

jshell> void helloJShell() { System.out.println("wow, I replaced a  method"); }
|  modified method helloJShell()
|    update overwrote method helloJShell()

jshell> helloJShell()
wow, I replaced a  method

Commands

Aparat from language syntax you can execute jshell commands. Some of the most useful ones (/help to list all of them) are:

listing variables

jshell> /vars
|    int x = 0
|    double j = 0.5

listing methods:

jshell> /methods
|    printf (String,Object...)void
|    helloJShell ()void

The printf method is defined by default.

listing sources

jshell> /list
  14 : helloJShell();
  15 : void helloJShell() { System.out.println("wow, I replaced a  method"); }
  16 : helloJShell()

editing sources in external editor

jshell> /edit helloJShell

Opens external editor, and replaces helloJShell method.

Example use cases

After 20 years of Java without REPL one might wonder what scenarios are suitable for JShell. Here are some examples.

Veryfing return type

Remember the time you learned that dividing two integers in Java does not result in floating number? For some time I was convinced that both numerator and denominator have to be floating for a result to be floating too. Let’s test that:

jshell> 1/2
$1 ==> 0
|  created scratch variable $1 : int

jshell> 1.0/2
$2 ==> 0.5
|  created scratch variable $2 : double

jshell> 1/2.0
$3 ==> 0.5
|  created scratch variable $3 : double

jshell> 1.0f/2
$4 ==> 0.5
|  created scratch variable $4 : float

jshell> 1/2.0f
$5 ==> 0.5
|  created scratch variable $5 : float

Turns out only one of them has to be floating.

Testing Java niuanses

Did you know that comparing autoboxed integers references which values are from range -128 to 127 (inclusive) returns true (they are cached)? You can verify that with shell in a matter of seconds:

jshell> Integer i1 = 127
i1 ==> 127

jshell> Integer i2 = 127
i2 ==> 127

jshell> i1 == i2
$35 ==> true

jshell> Integer i2 = 128
i2 ==> 128

jshell> Integer i1 = 128
i1 ==> 128

jshell> i1 == i2
$38 ==> false

Formatting

Sometimes the logs need to be verbose and properly formatted. This is tedious task and usually leads to few recompile cycles which significantly slows us down. Imagine you forgot what was the format sign responsible for integers. You can quickly verify that:

Let’s try %i (integer):

jshell> printf("I got %i apple",1)
|  java.util.UnknownFormatConversionException thrown: Conversion = 'i'
|        at Formatter$FormatSpecifier.conversion (Formatter.java:2691)
|        at Formatter$FormatSpecifier.<init> (Formatter.java:2717)
|        at Formatter.parse (Formatter.java:2565)
|        at Formatter.format (Formatter.java:2507)
|        at PrintStream.format (PrintStream.java:977)
|        at PrintStream.printf (PrintStream.java:873)
|        at printf (#s8:1)
|        at (#51:1)

Oops, maybe %d (decimal) :

jshell> printf("I got %d apple",1)
I got 1 apple

Conclusion

JShell is a very useful tool for prototyping and testing Java code snippets. Even though it is not yet officially released I highly recommend checking it out. There is also a JShell Java api which allows you to evaluate JShell from java. Once the java 9 is out I bet there will be JShell integrations in most popualar IDEs - this will make using it even more handy.

Solid in practice - Liskov Substitution Principle

3rd video of the series. This time it’s all about Liskov substitution.